Thursday, February 3, 2011

Princess Party ~ Royal Sweet Shoppe

Marie from Sweets Indeed Blog created this dessert station for her daughter. Be sure to look around her blog and visit her Etsy Shoppe for more DESSERT INSPIRATION!

The birthday girl was thrilled to see all of her favorite treats. Complete with madeleine cookies, mini hostess cupcakes, marshmallow puffs, Unicorn Candy Kabobs, and custom decorated cookies, this sweet station was calling her name. We centered the Dessert Station around a hand crafted/illustrated hanging princess and custom sweet shoppe sign. The backdrop and detailed elements such as these are part of our Sweets Indeed custom branding and the birthday girl gets to keep personalized items as a memento. We also incorporated damask pink fabric into our custom Table Tutu.
We love to create custom candy or dessert stations for kids parties. It’s important to bring in the personality and favorites of the birthday boy/girl and there is always a new spin that can be created for any theme.


(photo and content credit: Sweets Indeed Blog)

Wednesday, February 2, 2011

Tissue Paper Wreath Tutorial

Here is the GORGEOUS Tissue Paper Wreath Tutorial designed by Pluff Mudd Studio.
ENJOY!
This wreath can be made with any color or combination of tissue paper colors to coordinate with any party color palette, which makes it a perfect "go to" for any event!!!

Materials:
Foam wreath
Tissue Paper - cut into approx. 5 x 7 pieces (I used 3 packs)
Hot Glue
Skewer
Floral Wire
Ribbon (Bow)

Directions:
1. Cut a lot of 5x7 tissue paper pieces. I used three packs of tissue paper. (The small pieces that were left over after I cut the larger pieces were perfect for the outside and inside edges, so save those!!)
2. Pull the tissue paper in the center and twist into a point. There is one sample in the picture above. This takes some time, so turn on your favorite TV show to entertain you while you twist or include the kids.
3. Push the skewer through to make 2 holes at the top of the wreath. Pull through the floral wire to make a hanger on the back.
4. Heat up that hot glue gun. I used a wooden skewer to poke a hole in the foam wreath and squeezed some hot glue into the hole. (In the beginning, I thought I would poke a bunch of holes first. This did not work as well as I thought because each piece of tissue paper was a little different size after twisting. )
5. Use the skewer again to poke the tissue paper into the hole. This will save you from burning your fingers. :)
6. Continue poking holes, filling with glue, and pushing in the tissue paper until you have filled in the entire wreath.
7. Use the same process to fill in the center and outside of the foam wreath with the smaller left over pieces.
8. Finish off with a coordinating bow. I added one of my 3 inch party circles in the middle of the bow to include Cate's frog princess party theme.

VOILA!! A beautiful wreath!!


(photo and content credit: Pluff Mudd Studio)


Tuesday, February 1, 2011

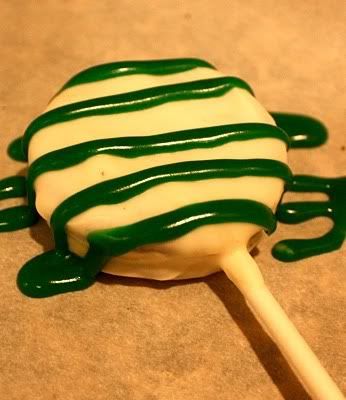
Oreo Pops Recipe

Here is the recipe for Pluff Mudd Studio Oreo Pops! YUMMY!

This is a great treat to add to your bag of tricks. Perfect for school parties, favors, dessert tables, treats for the neighbors, etc.

Ingredients and Materials:
Oreos (any flavor)
melting chocolate (It took me 2 bags for one package of cookies.)
sprinkles
cookie icing
wax paper
sucker sticks
small treat bags
ribbon
 
Here are the directions and few additional pointers!

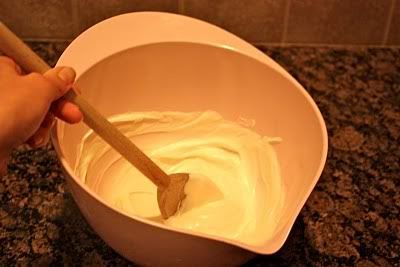
Melt the chocolate according to the directions on the package. I used chocolate made by Wilton and I thought I would be fancy and use my double boiler. However, it was much easier to melt the chocolate in the microwave. I also only bought one bag.. BIG mistake. Since this was my first try, I overheated the chocolate and it was too thick to dip the cookies. Be sure to have a bag or 2 on hand for mistakes. Once I figured it all out, I needed 2 bags for 1 package of Oreos. Next tip - Only melt a little to place the sticks. Then, go back and melt the majority of the chocolate when you are ready to dip the Oreo suckers.
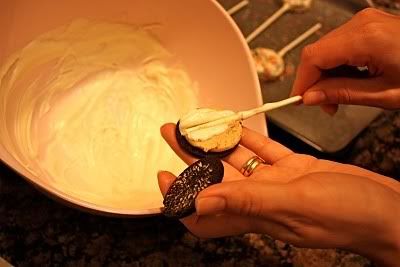
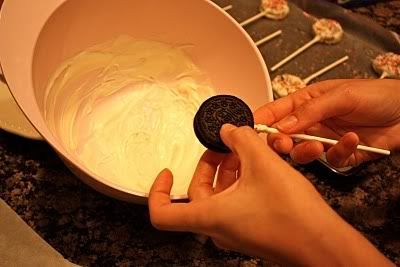
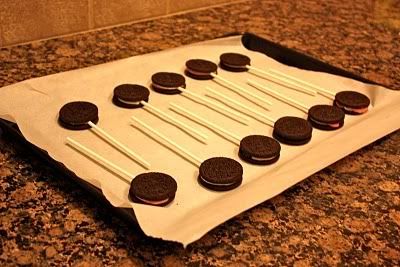
Separate the Oreos and line them on a tray. You do not want the chocolate to get cold, so having these divided helps a lot. At first, I had a hard time to get the stick to remain in the middle without breaking the cookie. Here is my trick - twist the stick with the hot melted chocolate into the Oreo cream and keep twisting. This will make a bed for the stick to lay in between the layers. I had 2 sizes of sucker sticks and the longer ones worked better for my project. If you are going to place them in a vase, container, etc. you want enough stick leftover to be visible.
Gently place the cookie on top the stick and place on the wax paper to cool.
I jumped the gun and started to dip these cookies too soon! I discovered that placing them in the refrigerator for a few hours made them nice and strong.
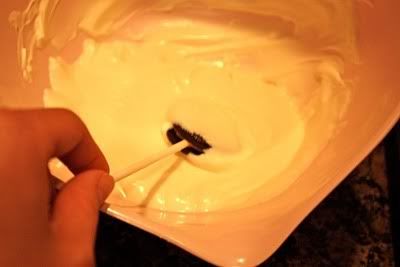
Dip the cookies in the yummy melted chocolate and place on a piece of wax paper.
I used cookie icing to add the green stripes.
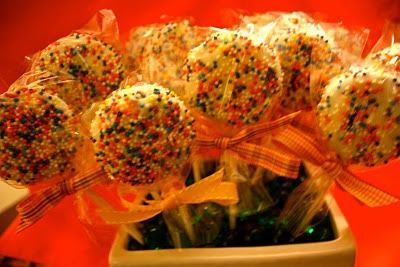
If you want to add sprinkles, be sure to do it when the chocolate is still hot.
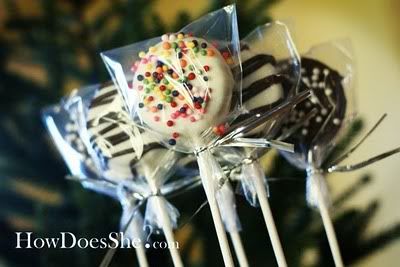
After the suckers have cooled, package them in small clear treat bags and seal with a ribbon. I used a white flower pot and added floral foam. I covered the top with glass beads and pushed the suckers into the foam. Voila - Oreo Cookie Pops.

(photo and content credit: Pluff Mudd Studio)

Monday, January 31, 2011

Frog Princess Party

I found this colorful and sassy party over at Pluff Mudd Studio blog. Christina is very talented and also has an Etsy Shop full of  cute items. 
The party was inspired by this adorable Shrimp and Grits Kids Smocked Bubble!! The bright pinks and greens were the color scheme for the party and the frog princess made quite the debut throughout all the little details.
Cate's invites kicked off the party with the sweet frog princess graphic and bright pinks and greens. I love polka dots, so I added a pink border with green polka dots. I like to jazz up the envelopes too, so her invites were sent in a green envelope with a cute coordinating address label. (The printable invites are coming soon to the Pluff Mudd Studio Etsy shop!)
I sneaked in a little polka dot here and there in the party decoration too. :)

The custom crown was made by Amy from the amazing Esty shop, True Love Found. I sent her the digital file of Cate's invite and she made this precious coordinating crown. She even included some polka dot ribbon the bottom.
Love it!!

I love to design a wreath that welcomes the guest and includes the theme. I made a tissue paper wreath (tutorial coming soon) for Cate's party. It turned out much better than I expected. I accented it with a green polka dot ribbon with a frog 3 inch party circle in the middle. It was perfect for her party.
The tables looked beautiful set-up along the marsh front! I was lucky to find a couple sets of pink polka dot and green polka dot plates on sale. The pink and green cups were part of that same set. The party circles made lots of appearances in the party decor!! (The printable party circles are coming soon to the Pluff Mudd Studio Etsy shop!)

The grass centerpiece, accented with pinwheels and 3 inch party circles, complimented the outdoor landscape. Val, from Crafty Go Lucky, sent me the cute frog and pink paper precut into pinwheels. I just spray painted skewers pink and attached them. I backed the 3 inch party circles with coordinating scrapbook paper, attached them to the pink painted skewers, and added some ribbon....Voila...... a centerpiece.
The napkin rings are small versions of the tissue pom-poms hanging above the dessert table (tutorial coming soon). Each child had their own cup personalized with a 2 inch party circle. This was key since all the cups were either pink or green. The party circles were perfect drink tags for the adults too. It was easy to identify your drink by the different tags, frog Cate, happy birthday, #1, etc.


The dessert table was filled with yummy cupcakes, oreo pops, cheerios, animal crackers, custom frog cookies, etc. Of course the party circles made an appearance again as we labeled all the treats. I added in the polka dots using the fun fabric and polka dot ribbon. The adorable frog painting was made by one of my friends, Thanks Noelle!

These precious cookies were custom made by Lisa from The Cookie Jar. I sent her the graphic and she matched it perfectly! The kids loved these sweet treats.

Isn't this cake precious?? The gals at Ashley Bakery surpassed all my expectations with the cake and cupcakes!! I thought the frog cake would be her smash cake, but the bakery sent a smash cake much easier for Cate to eat. I guess all that fondant would have been hard for her to manage. I made the yummy Oreo Pops and sprinkled them with pink and green to coordinate with the dessert table- visit the Pluff Mudd Oreo Pop tutorial.

The frog pond cupcakes were my favorite!!! Even the pink cupcakes were accented with a little fly. It was fun to watch everyone ooh and aah over them!

Every party for one year olds needs the staple of Cheerios and animal crackers!
Here is Cate's smash cake! She was so dainty!! Mommy had to get in there and help her get started.
Once she got going, there was no stopping her. She really enjoyed it.
The party circles made yet another appearance in her high chair banner.
Of course you can't have a party without favors!!! Each child had a box of goodies from Cate- "Thank you for hopping over to my pad!"


These amazing photos were taken by Lynn, from Town and Country Photography. She captured all the details and really made the party look stunning. Most importantly, all the wonderful memories are preserved for us to share with Cate and remember her very special birthday!!

Our pug, Sophie Lulu - Cate's best buddy, even got in the spirit with her pink boa collar!


(photo and content credit: Pluff Mudd Studio)
Related Posts Plugin for WordPress, Blogger...